Showing posts with label Perfect Pearls. Show all posts

Saturday, 4 July 2009

Perfect Pearls Class Update

The Perfect Pearls class we had on Friday at Scrappingville was such a blast!! That was actually my first time teaching a class. Everyone did a splendid job on their projects and I am so happy that they all enjoyed themselves.


Picture time.... although by the time I thought of taking photos, a few of the ladies has already left.


And hey... look who dropped in to do a layout?

Thank you everyone for attending my class and for bringing along lots of creativity!!

Thursday, 25 June 2009

Perfect Pearls Class


I will be teaching a class on Perfect Pearls in Scrappingville on the 3rd July @ 2pm. If you are interested, please hop over to Scrapinggville's blog and register or just drop by the shop in Bangsar Shopping Center to put your name down.


Tuesday, 12 May 2009

LOVE

It's been some time since I last scrapped. After the SK Ultimate Scrapper competition, I was busy with lots of beading so had to give scrapping a rest.

But today I finally had the time to scrap something that has been playing on my mind for a few months now. I just hadn't had the right photo or the right mojo to do it.

The something is to scrap a layout entirely using Perfect Pearls technique. And today I took the time and put everything that's been playing on my mind to work. This is what I came out with:
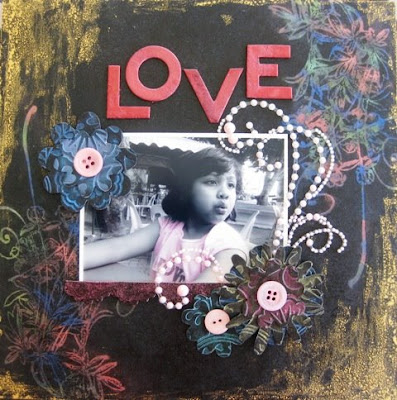


Everything in the layout was done with Perfect Pearls except for the buttons and pearl swirlies.

I bought a cake board the size of 10x10 and peeled off the paper and painted it black. Stamped the background with Perfect Medium and blend in several colours of Perfect Pearls. On the sides, I mixed the gold Perfect Pearls with water and just brush it in.

For the flowers, I diecut a thin chipboard piece with my Big Shot, paint it black with acrylic paint, embossed the pieces using my very new Cuttlebug embossing folder (:D) and brush in Perfect Pearls. Lay out a wet wipes or damp cloth and gently rub the flower pieces facing down to remove some of the colours on the raised parts. And the result is very nice indeed!!

Materials used:
Cake board (10x10), Perfect Pearls, Perfect Medium, Black spray paint, Alpha acrylic paint, Chipboard pieces, Big Shot flower die, Cuttlebug embossing folder, Black embossing powder, K&Co chipboard letters, Prima Marketing Say It In Pearls, Making Memories buttons, Prima Marketing clear stamp, Fancy Pants clear stamp.


Target: 100 LOs
Done: 81 LOs
To do: 19 LOs

Wednesday, 24 December 2008

More Techniques

Ever since I first started reading Tim Holtz's blog, I've always wanted to produce a whole bunch of beautiful tags that I could just look and admire again and again and again. So a few weeks ago, I decided to start one. I was actually trying out some new techniques and decided on the tags with the instruction of the techniques on one side of the tags. Thus, while looking through the beautiful tags, I can flip through to the other side and always be reminded of how I came out with it.

I've done 18 so far, using materials such as TH Distress Ink Pads, Perfect Pearls, UTEE, melting pot, acrylic paints, TH Distress Embossing powders, ordinary embossing powders, little squares of mirror, StazOn ink pads, rubber stamps and lots of embellishments.

Here are the tags:


There are still a few more products that I have not tried my hands at: alcohol inks, distress crackle paints, acrylic paint dabbers and lots more. I can see my shopping list getting longer and longer.. *ka-ching ka-ching*


LinkWithin

Related Posts with Thumbnails